Laboratories and Testing
To provide laboratory services to support the programs within the Department of Health and Welfare, Idaho’s seven public health districts, other state agencies, and citizens. These services can be organized into four functional domains.
TESTING
Electronic test requests and results:
-Request access to electronic test requests and results
-Access electronic test requests: LabOnline
-Access online test results: Web Portal
Communicable disease agents in clinical specimens: Clinical test request forms
Contaminants or adulterants in water, food, and soil: Environmental test request forms
Biological and chemical threat test request forms
INSPECTION
Clinical and environmental laboratories
X-ray and mammography units
Air quality monitoring stations
TRAINING
Consultation and workforce development
Continuing educations seminars and telelectures
Scientific presentations at local, regional, and national meetings
OUTREACH
Development and evaluation of new analytical methods
Maintenance of the Idaho Sentinel Laboratory Network
Publication of applied public health research
Sample Collection and Testing for Sprouts and Spent Irrigation Water
It is to be used by stakeholders, sprout producers, private laboratories and government personnel when doing an analysis for the detection of Salmonella species (spp.) and Escherichia coli (E. coli) O157:H7 in sprouts or spent irrigation water.
Testing of Spent Irrigation Water
Procedures are provided for testing spent irrigation water and sprouts. Health recommends that processors should regularly test, as a minimum, spent irrigation water. Spent irrigation water that has flowed over and through sprouts is a good indicator of the types of microorganisms in the sprouts themselves. Microorganisms found in spent irrigation water is expected to be fairly uniform. Thus, sampling procedures for the spent irrigation water are relatively simple. Furthermore, water can be used directly in the test procedures described here. The only potential disadvantage of testing spent irrigation water is that the level of microorganisms recovered in spent irrigation water is about one log (10 times) less than the level in sprouts. If pathogens are present in sprouts at very low levels, it is possible that they may not be detected in the spent irrigation water, but could be recovered in sprouts if sprouts were tested.
However, testing the sprouts themselves has several significant disadvantages. First, a number of sprout samples must be taken from different locations in the drum or trays to ensure that the sample collected is representative of the batch. Furthermore, additional preparation (e.g., selecting representative sample units for analyses, blending or stomaching, and allowing sprout particles to settle out) is required when testing sprouts. Finally, the need to wait for analytical results on the sprouts will delay the delivery of the final product to the market. Each additional step in any procedure (sampling or testing) could introduce contamination.
Sample collection
Sample collection should be done on site by personnel that have been trained to collect representative samples aseptically. Aseptic sampling procedures are described below.
Testing Facility
Health recommends that all microbial testing for pathogens be conducted in an external, certified, independent laboratory that should meet several key criteria. First, the laboratory should be physically separated from the food production facility to prevent cross-contamination from test materials. This is especially important since the materials used in the enrichment step required before testing and the positive controls can contain pathogens and, if not properly handled, may contaminate sprouts.
Second, the laboratory should be staffed by personnel with training and experience in analytical microbiology techniques to ensure that tests are performed correctly and that all appropriate safety precautions, including appropriate waste disposal, are followed. Third, the laboratory should have appropriate resources and be able to demonstrate that they follow a quality management system. If the microbial analysis is done by the sprout producer, the laboratory facilities, personnel, and management system should also meet all these criteria to ensure that testing is reliable and does not create food safety hazards.
Reef Aquarium Chemistry
Every healthy ecosystem requires a balanced environment. Weekly water tests are invaluable to making sure your aquarium’s levels are in check. Understanding water chemistry and maintaining optimum levels of key nutrients, minerals and other indicators will protect marine life and allow the organisms in your care to thrive and radiate. Below are the key parameters to monitor in saltwater reef aquaria.
AMMONIA
Target Value: 0
Ammonia is a toxic nitrogenous compound released when anything organic breaks down. A large amount of decomposition (e.g. from a carcass or uneaten food) can cause ammonia to spike. Specialized bacteria convert ammonia to nitrite.
TOO MUCH
Ammonia levels above 0.25 ppm can suffocate fish, coral and invertebrates in a matter of hours. It is typically present in new tanks and should be cycled out completely before animals are slowly introduced. Ways to decrease:
Dilution via water change
Ammonia neutralizers such as Seachem Prime
Biological filtration (add heterotrophic bacteria like Prodibio to speed up biofilter development)
Aquatic plants absorb and benefit from ammonia
TOO LITTLE
No issues arise from too little ammonia, except when cycling a new tank. Ammonia is necessary at first to fuel the development of bacteria that convert ammonia to nitrite. Ways to increase:
Add a carbon source (e.g. food, animal waste, or other organic matter) and allow to decompose
NITRITE
Target Value: 0
Nitrite is a toxic nitrogenous compound produced by bacteria as part of the nitrogen cycle. Specialized bacteria convert nitrite to nitrate.
TOO MUCH
Nitrite will reduce the amount of oxygen in fish’s blood, and levels above 1 ppm can be lethal in a matter of hours. It is typically present in new tanks and should be cycled out completely before animals are introduced incrementally. Ways to decrease:
Dilution via water change
Nitrite neutralizers such as Seachem Prime
Biological filtration (add heterotrophic bacteria like Prodibio to speed up biofilter development)
Add aquarium salt to reduce nitrite toxicity
Integrity Testing For Roofing And Waterproofing Membranes
Integrity testing is the ‘holy grail’ of building envelope work. To have an assurance that the portions of a building that are expected to get wet due to weather are in a condition to prevent water transmission to the interior is the goal of every contractor, as well as every owner. As a result an entire industry, that of testing laboratories, has been created. Finding test methods to give that assurance has evolved over the decades, with each new advancement in testing providing either more accurate results, results in less time, or both. This document will provide information about the historical as well as state of the art testing methods available.
Historically there have been five widely used testing methods for testing of horizontal membranes: spray testing, flood testing, capacitance (impedance) testing, nuclear metering, and infrared (IR) thermal imaging. Within the last two decades, two new methods of testing have revolutionized the leak detection and integrity testing industry. These methods utilize electricity and a simple electric circuit to detect and identify problem conditions in roofing and waterproofing systems
These are generically referred to as ‘Low Voltage Electrical Conductance Testing’ and ‘High Voltage Spark Testing’. To explain or address all the principles and subtleties of how each testing method should be done to provide accurate results would require more time and space than allowed. This document will focus on highlighting the testing methodologies, scientific principles, and their advantages and limitations. Special attention will be given to limitations
This is due in large part to the fact that it has come to the attention of the author that the abilities of the high and low voltage techniques are frequently overstated resulting in un-met expectations on the part of owners and contractors which lead to skepticism and possibly a bad reputation of an emerging technology.
As with most investigative tools, the test method selected is only as good as the experience of the person used to perform the test. Knowledge of all the test method options is only the first step. Knowing the benefits and more importantly the limitations of each system will assist a knowledgeable individual to quickly and cost effectively locate and repair all breaches within the membrane
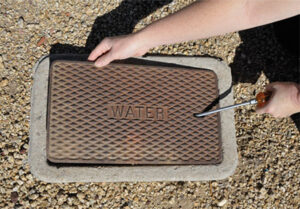
What is a Water Meter?
A water meter is a device that measures the volume of water delivered to a property. Some water meters measure water in gallons while others measure in cubic feet.
Most residential water meters are located near the curb or sidewalk at the front of the property in a concrete “box.” The water meter box will have a metal or plastic lid and may be marked, “Water Meter.”
Use a long screwdriver to remove the lid. However, be cautious as insects, reptiles or other small animals occasionally take residence inside the boxes. Some water meters will have a small, hinged cover while others may not. Lift the cover and use a damp rag to wipe the face clean.
Understanding the Water Meter
Look at your water meter to determine if you have an analog (dial) or a digital display. Instructions for reading both types of water meters are included in this section.
The large sweep hand on the dial measures water use in gallons or cubic feet. One gallon or one cubic foot of water passes through the water meter as the sweep hand moves from one number to the next (e.g., 0 to 1). A complete rotation equals 10 gallons or 10 cubic feet depending on the unit measured. Most analog dials have a low-flow indicator that turns as water moves through the water meter. This typically looks like a small triangle (shown), star or gear.