Do it Yourself Light Switch Installation
Changing a Light Switch
Homeowners may choose to replace or upgrade a light switch for functional or for aesthetic reasons. Changing the light switch is a simple and inexpensive DIY project.
Understanding how the switch is wired is the most important part. When you turn on a light switch, power goes to the light through the “hot” (black) wire and then back through the neutral (white) wire to the ground. The bare or green-wrapped ground wires serve as a backup to divert the power safely away in case of an electrical fault.
In most cases, two black wires will be attached to the switch’s two terminal screws. The white wires will be connected to each other but not to the switch itself; this connection is typically secured by a plastic wire nut. The ground wires will be connected to each other and attached to the grounding screw on the switch.
Turn Off Power
Turn off the power to the circuit at the circuit breaker or fuse box. You can double check to ensure that it was turned off by flipping the switch in an attempt to operate a light, and by using a voltage tester once the switch plate is removed to confirm that the wires are not charged.
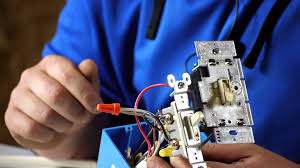
Remove Switchplate and Switch
Use a flathead screwdriver to remove the switch cover, and a Phillips head screwdriver to remove the existing switch from the box.
Remove Wires From Old Switch
Use a screw driver to loosen the screws holding the electrical wires on the side of the switch, and then disconnect the wires from the switch itself. Pay attention to the wire colors and where they had been attached on the old switch, as you will be duplicating their placement on the new switch. Using needle nose pliers will be helpful while working in this small space. Keep the wires separated by bending them to opposite corners of the box. If the switch is grounded, remove the grounding wire last.
Attach New Switch
There will be three wires: one black, one white, and a separate ground wire that may be bare copper or is sometimes wrapped in green. Inspect the quality of the wires. If any of the wires seem weakened, trim and re-strip the end of the wire to meet your needs.
Identify the three different colored wires, and attach the new light switch to the wires in the same way they had been attached to the old switch. If your wires are solid copper, create a loop in the end of the wire with the pliers and guide it around the screw on the side of the switch. Tighten the screw, ensuring that the wire is securely held beneath the screw and is not splaying to the perimeter of the screw. If your wall wire is composed of a group of smaller wires, use the pliers to gently twist the ends of the wires together to make them “whole,” and then follow the same direction.
Attach Switch and Reinstall Plate
Once the wires are attached, you can gently fold any excess wire and compress the dimmer into the electrical box. Move slowly to ensure the wires don’t loosen or break if you have to force the switch into position. Tighten the screws to secure the switch to the box, and fit the switch plate. You may find that tightening or loosening the switch in the box by a few small twists of the screw driver makes a difference with how well the plate fits over the box. Once the cover is in place, turn the breaker or fuse back on, and check your handiwork.
Switches vary in both the number of poles and the number of throws.
Most switches have one or two poles and one or two throws. This leads to four common combinations: Switches with more than two poles or more than two throws are not commonplace, but they do exist. Rotary switches lend themselves especially well to having many throws. For example, the rotary switch in a multimeter typically has 16 or more throws, one for each range of measurement the meter can make.Here are a few other points to ponder concerning the arrangement of poles and throws:
- A common variation of a double throw switch is to have a middle position that does not connect to either output. Often called center open, this type of switch has three positions, but only two throws. For example, an SPDT center open switch can switch one input between either of two outputs, but in its center position, neither output is connected.
Replace an Outlet
Replacing an electrical outlet is just as easy as replacing a switch. In fact, it follow basically the same procedure and you don’t need to worry nearly so much about getting the right type of outlet. Outlets come in three types:
- Ungrounded. An ungrounded outlet only has two holes. It doesn’t have the round third hole used for grounding. You typically only see these in older houses.
- Grounded. This is the standard three-prong outlet you’re probably most familiar with.
- Ground-Fault Circuit Interrupter (GFC or GFCI). This type of switch has a built-in breaker that automatically and instantly disconnects the switch, interrupting power in case of a short. You typically find them in areas that might be exposed to water or excessive moisture, like bathrooms, garages, and workshops.
When it comes to replacing the outlet, the procedure is pretty simple. Make sure the power is off. Remove the faceplate and remove the screws holding the outlet in its box. Pull the outlet and wires out from the wall enough that you have space to work. Note where the white (neutral), black (power), and green or bare copper (ground) wires are attached on the existing outlet. Remove them and attach them to the same place on the new outlet. Turn the breaker on to test the outlet and, if it works, turn the breaker off and secure the outlet back into the wall. It’s as simple as that.
How to Add a Second Light Switch Without Wiring
Once you get the new switch and your tools, you can get started. Go to your breaker box and turn off the power to the lights that you want to control. After yo udo this test to make sure there is no power to the lights or switch by trying to turn it on.
- Unscrew the wall plate.
- Unscrew the existing switch.
- Mark the wires before you remove them.
- Disconnect the wires from the current switch.
- Connect wires to the corresponding parts of the Lutron switch.
Once you have these steps done, you should secure the switch, but don’t reinstall in the wall yet. Turn the power back on and make sure the switch works. If it does, turn the power back off and screw the switch in place and put the wall plate on. If it doesn’t, you can troubleshoot.
Does it matter which black wire goes where when changing a light switch?
The black wire is the hot wire, the one you should never touch with the power on. Correction: never touch any wire with the power on, and use a meter to double check they are all off before touching anything.
Next, never do any wiring unless you completely understand the task at hand.
If you have two black wires in the box one may be bringing power in, and the other leading it out. If that is all that is there then the switch can go between them in either order. If you have anything else stop and get further help where you can post pictures and a better description of this spot. Properly you should have a black always hot wire bringing power in and a red wire going to the light. Red means the line may be switched.
Sometimes electricians go cheap and use black instead of red.