Home Electrical Safety Inspection For Homes And Small Businesses

Ways to Be Safe Around Electricity: Electrical Safety Rules to Remember

We love electricity – it keeps us warm, makes our homes bright, allows us to access all of our entertainment, enables us to eat a warm meal whenever we want and so much more. Electricity has made our lives more enjoyable in so many ways– but that doesn’t mean it comes without its risks–we’ll walk you through some electrical safety tips that all homeowners should be aware of.

According to the National Fire Protection Association, U.S. fire departments responded to an estimated annual average of 47,820 reported home structure fires in 2007-2011– all started by electrical malfunctions. The Electrical Safety Foundation International found that each day, seven children must be treated for injuries caused by electrical shock.

Gain some knowledge on basic electrical safety tips– these five tips will help you enjoy the devices and appliances you love while keeping everyone safe from harm.

Replace or repair damaged power cords

Exposed wiring is a danger that cannot go overlooked, the NFPA wrote. If you see the protective coating on a wire is stripped away, be sure to replace it or cover it with electrical tape as soon as possible.

 Don’t overload your outlets

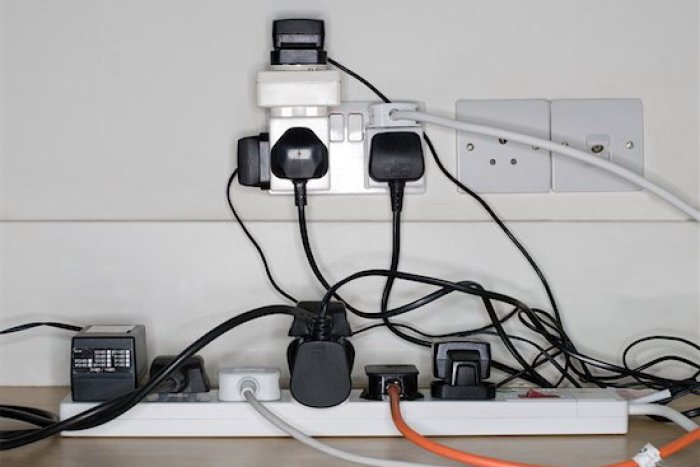
Every outlet in your home is designed to deliver a certain amount of electricity; by plugging too many devices into it at once, you could cause a small explosion or a fire. If you have a lot of things to plug in, use a power strip (an energy saving one of course!) that can safely accommodate your needs.


Check that you’re using the correct wattage in all your fixtures and appliances.

Using the right bulbs can prevent electrical problems, so check all lamps, fixtures and appliances to ensure you’re using the correct wattage. If a light fixture has no wattage listed, use 60-watt bulbs or less. For unmarked ceiling fixtures, choose 25-watt bulbs.

Keep your used and unused cords tidy and secure to prevent damage.

Electrical safety rules don’t just apply to power cords when they’re in use—cords also need to be stored safely to prevent damage. Keep stored cords away from children and pets (who may chew on or play with the cords). Try to avoid wrapping cords tightly around objects; this can stretch the cord or cause overheating. Never rest a cord on a hot surface in order to prevent damage to the cord’s insulation and wires.

Unplug all your unused appliances to reduce potential risks.

One of the simplest electrical safety tips is also one of the easiest to forget: when an appliance is not in use, unplug it. Not only does this save you power by reducing any phantom drain (the amount of energy the device consumes even when not actively in use), but unplugging unused appliances also protects them from overheating or power surges.


Always be aware.

Never use metallic pencils or rulers, or wear rings or metal watchbands when working with electrical equipment. This rule is very easy to forget, especially when you are showing some electrical part pointing with metallic pencil.

Remember: gloves, clothes and shoes. 

When it is necessary to handle equipment that is plugged in, be sure hands are dry and, when possible, wear nonconductive gloves, protective clothes and shoes with insulated soles.

Like in previous rules – Always disconnect the power FIRST.

If an individual comes in contact with a live electrical conductor, do not touch the equipment, cord or person. Disconnect the power source from the circuit breaker or pull out the plug using a leather belt.

Tricky situation, and you must be very calm in order not to make the situation even worse.


Never try repairing energized equipment.

Always check that it is de-energized first by using a tester. When an electric tester touches a live or hot wire, the bulb inside the tester lights up showing that an electrical current is flowing through the respective wire. Check all the wires, the outer metallic covering of the service panel and any other hanging wires with an electrical tester before proceeding with your work.

Never use an aluminium or steel ladder

If you are working on any receptacle at height in your home. An electrical surge will ground you and the whole electric current will pass through your body. Use a bamboo, wooden or a fibreglass ladder instead.

Always check all your GFCI’s once a month.

A GFCI (Ground Fault Circuit Interrupter) is a RCD (Residual Current Device). They have become very common in modern homes, especially damp areas like the bathroom and kitchen, as they help avoid electrical shock hazards. It is designed to disconnect quickly enough to avoid any injury caused by over current or short circuit faults.


Avoid mixing liquids and electricity.

They should be kept as far apart as possible. Touch your appliances with dry hands only. Avoid placing water or other liquids on top of electrical appliances. Many of us use the TV top or microwave as a counter but that’s actually very dangerous if liquids spill into open slots and cause a short circuit. And while using a steam kettle, do not fill it up while it’s still plugged on

Make sure that your children do not walk in wet into the house directly from the rain or your swimming pool. Your home is a place that is full of electrical sources and could pose a threat to their safety. Get them to dry out completely before entering the house.

Hunter Ceiling Fans Advice

ULTRA GUIDE OF CHOOSING BEST CEILING FANS FOR HOME

They are quite useful for many reasons, and they even look nice hanging from the ceiling. You can find them in many different looks to match any decorating style you may have. They come in different colors, different options, and different sizes, allowing you to find the perfect option for any area where you want to improve air circulation.

Where Can You Install A Ceiling Fan?

Ceiling fans can be installed in just about every room inside and outside of your home. While they work the same in every space, the advantages in specific rooms are a little different.

You can place them in bedrooms to keep a nice temperature while you sleep and spend time in the space. Some people even appreciate the sound of a ceiling fan as they sleep. You can also install ceiling fans in your bathroom. This is a good option when you want to circulate the air in this room as it can help the moisture when it builds up and the smells that occur here.

Hectic life and taste

Installing a ceiling fan can not only make your home more comfortable but can also add to its charm and character. This is particularly true if you choose an attractive fan that is a good match for the rest of your decor

Fasten air circulation

Ceiling fans can improve air circulation. As technology improves nearly every day, more and more new options are introduced. For most year-round use ceiling fans, it can keep you cool in the summer and warm in the winter. They can also help you cut down on heating and cooling costs.


Ceiling Fans Buying Guide

The ceiling fan— a child of the Industrial Revolution—is still one of the most sensible solutions to home comfort despite a virtual revolution in the world of home comfort appliances. After more than a century, ceiling fans continue to be a simple but charming supplement to home cooling and heating.

Why this lasting popularity? Certainly charm is a factor. For some people, the steady, quiet whirl of the paddles evokes the romance of bygone days and sultry summer afternoons. More important is the fan’s practical side. It makes a room more comfortable and lowers energy bills. By forcing warm air downward in the winter and stirring up breezes in the summer, it decreases demands on heating and air-conditioning systems. And yet it operates on just pennies a day.

During the summer, using a ceiling fan in conjunction with an air conditioner will allow you to set the thermostat higher without a noticeable difference in comfort. A fan’s breeze will make a 79-degree room feel more like 72 degrees. By raising the thermostat, you can save up to 30% on your air-conditioning bills, depending on your home’s construction and where you live.

Ceiling Fan Controls

Most fans are mounted at a ceiling box where a light fixture was formerly located. Typically, the light switch is replaced with a control that allows various fan speeds and—if the fan includes lights—light settings. It’s important for this control to have a capacitor design and be made by the same manufacturer as the fan to eliminate buzz and hum.

Fan Blade Sizes & Materials

Fans have from three to five blades; the traditional number is four. The number of blades does not affect performance much. Some say that more blades actually move less air because there is less space for them to grab air. But the number of blades does tend to affect cost. Generally speaking, the more blades the higher the cost


a guide to choosing the right one

The ceiling fan is one of those household essentials in which form and function can be perfectly married. The latest styles range from graceful good looks to fabulous statement-makers, and they’re useful year-round to help keep you cooler in summer and warmer in winter. Here’s what you need to know.

SIZE MATTERS

When it comes to ceiling fans, size is actually everything. “A small fan in a large room will have to work twice as hard to cool you off, while a large fan in a small room may create an uncomfortable amount of airflow,” says Beacon Lighting’s Denise Hammond. For a small to medium-sized room up to 4m x 5m, select a fan with 122cm blades, suggests Denise, while blades of 132cm-plus will suit a room size of up to 6m x 6m. In a large, open-plan space, you may need two or more models

It’s less the number of blades than the shape of the aerofoil that truly determines the effectiveness of the fan, explains Sarah Johnston of Big Ass Fans. “Our aerofoil design includes an upswept blade angle, that has been designed to provide greater air flow and therefore more effective coverage of a room in comparison to traditional ceiling fans,” she says

PERFECT POSITIONING

“Blades need to be at least 2.1m from the floor,” says builder Patrick Toner of All Things Building, so if you have low or standard 2.4m ceilings you’ll need to look for a low-profile model that can be fitted flush to the ceiling. “Most fans come with a ball canopy fixing method, which means fans can be mounted on sloping, vaulted or flat ceilings,” explains Denise. For high or raked ceilings, an extension rod might be necessary to actually bring the fan down to an efficient height

In a small room with one fan, centering it is logical for both aesthetics and efficiency. However in a large bedroom, it might make better sense to position it over the bed for relief on hot nights. In an expansive, open-plan room, consider using fans to ‘zone’ spaces, such as placing one over your sitting area and one above the dining table. Be aware that fans need to be fitted securely to joists or blocking, and should be positioned away from downlights to prevent flickering. “There’s no hard and fast rule for this distance,” says Patrick. “It depends on how far the fan is from the ceiling and the angle of light from your downlights. Ask your builder and electrician for advice.”


Ceiling Fan Buying Guide

Choose the Right Ceiling Fan for Your Space

A ceiling fan’s primary purpose is to circulate air in a room. Air conditioners chill air, but ceiling fans push it around, which means they’re useful for both cooling and heating. In a bedroom, a ceiling fan encourages restful sleep without running the air conditioning. On an open or screened porch, a ceiling fan can create a refreshing retreat — just be sure it’s rated for damp or wet locations. Look for outdoor fans with weatherproof fan blades, too. Both types can handle moisture, but damp-rated fans shouldn’t come in contact with water. Wet-rated fans are suitable for coastal or rainy areas.

Ceiling Height

When selecting a new or a replacement ceiling fan, keep in mind the ceiling height. The ideal fan height from floor to fan blades is approximately 8 feet. Many fans have multiple mounting options, allowing them to work almost anywhere in the home. Measure the height of your ceiling to determine the mounting option that’ll work best for your space

Mounting Options

Flush Mount: Made for rooms with low ceilings where a low profile is wanted or required. These ceiling fans are mounted flush to the ceiling, with no extra attachment.

Ceiling Fan Blades

The look of a ceiling fan’s blades are actually more of a design feature than a matter of efficiency or utility. The fan’s ability to move air is determined by the pitch of the blades, so pick the one you like the look of best. Many fans come with reversible blades so if you get tired of one finish, you can reverse them later. Talk about an effortless design update. The number of blades and blade shapes are also getting a makeover. Some fans have as many as nine blades, for a helicopter style; however, the traditional four- to five-blade ceiling fans remain classic.

Ceiling Fan Direction in Summer and Winter

Change the ceiling fan direction to make it more comfortable year-round, and save energy and money by adjusting your thermostat. In the summer, set the fan blades to revolve in a counterclockwise direction as you look up at it to create a downward motion and a cooling effect. Doing this also raises the thermostat temperature, which will reduce your air conditioner’s workload.


Things To Know Before Buying a Ceiling Fan

Energy Savings

Ceiling Fans are great for improving room comfort while at the same time producing energy and cost savings. Homeowners are experiencing higher energy costs and it’s only going to get worse. There has never been a better time than now to consider the purchase of a ceiling fan(s)and to enjoy both the aesthetic as well as energy saving benefits of owning a ceiling fan. In summer ceiling fans allow you to feel cool without having to turn the air conditioning full-on therefore saving energy and money. Setting your thermostat higher with a ceiling fan running can save up to 40% on air conditioning bills. Studies show this can make a room feel up to seven degrees cooler. In winter ceiling fans should be reversed and used to push the warm air down from the ceiling to keep the heat in the lower part of the room. This is especially important in rooms with tall ceilings, resulting in energy and money savings from recirculating the warm air allowing one to set the thermostat lower.

Larger Rooms Need Bigger Fans

For maximum performance, choose the right fan to fit your room size. In a room up to 50 square feet, like a bathroom, choose a 29″ fan. Breakfast nooks and laundry rooms up to 75 Sq. ft. choose a 36″ blade span. Medium size rooms up too 100 square feet can fit fans from 36″ to 42″. Standard bedrooms and family rooms up to 400 square feet work most efficiently with fans that are 50″ or 52″. Great rooms or large areas over 400 sq. ft. require a ceiling fan with a 54″ or larger blade span. For long or large rooms, you should consider more than one fan to handle your cooling requirements. For maximum comfort, the fan should be placed as close to the center of the room as possible. Keep blade tips at least 18 inches from any wall. Ceilings Lower Than Eight Feet. Use the Ceiling Mounting Kit or go with a Snugger or Hugger model to achieve the desired seven-foot blade clearance.  For ceilings above eight feet, the fan should be hung by a downrod extension so that the fan is eight or nine feet from the floor. You will want to hang it at this level since the higher the fan is hung above eight feet, the less air circulates near the floor.

Bathroom and Outdoor Ceiling Fans

Look for a bathroom ceiling fan specifically designed and UL-listed for damp locations. Bathroom Ceiling Fans start at 29 inch blade spans since smaller rooms require less air movement and space is usually limited. Want one for the covered outdoor patio? Opt for an Outdoor Ceiling Fan that this is UL-listed for wet locations. Outdoor ceiling fans can also be used indoors. They have protective motor coverings to keep moisture from corroding the motor

Fan Blade Pitch and Size

Fan blades determine the amount of air being circulated throughout the room. Fan blade pitch is usually between a 12-15 degree angle for optimal circulation. Fan blades must be weighted and matched as a balanced set to avoid having your fan wobble. Ceiling fans with less than a 12 degree angle will not circulate air as well and be less efficient. The greater the angle or higher the pitch of the blade the more air circulation you will have in your room.

The Motor

The motor is responsible for producing quiet operation while driving the blades for air movement. Look for high-quality motors with heavy-duty windings and sealed bearings that are permanently lubricated. Smaller, less powerful motors found on lower quality fans may produce higher operating temperatures, lower air circulation and noisier operation. Motors are designed to work flawlessly for long periods of time and should have a long lasting life

An Electrical Contractor Talks About Electrical Wiring

Examples of bad and dangerous electrical wiring systems

As a leader in fire damage restoration, MCH is often called to homes that have had an electrical fire. We have seen many dangerous electrical wiring systems that have failed and caused damage to the home. To keep you safe, we have pulled together some of the most common dangerous electrical wiring systems that we see.

General Bad Electrical Wiring

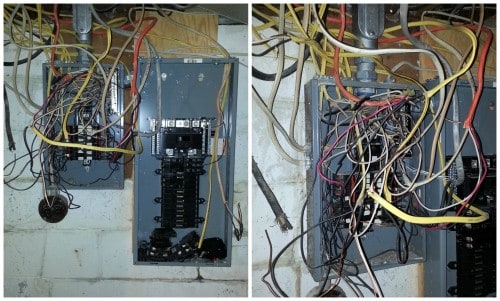
This doesn’t take much explaining! If your fuse box or electrical panel looks anything like this, it is time to call an electrician to get it sorted out. This many wires all over the place is a recipe for disaster.

Open Splice Causes Attic Fire

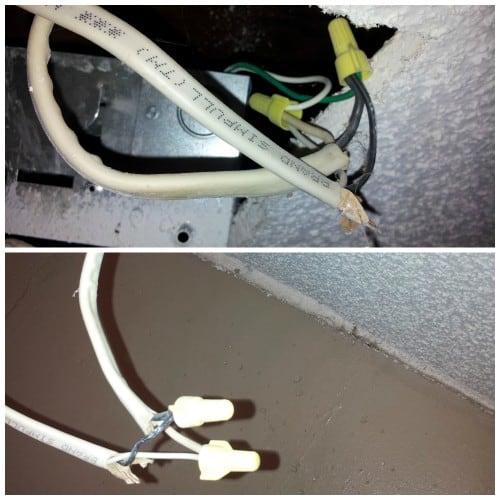
We came into this home after an electrical fire had occurred and knew immediately what happened. An open air splice in the electrical wiring systems caused a good sized fire in the attic of this home.

Wiring Issue in Ceiling

Wiring issues may not be where you can see them. We found this issue during an installation job, luckily we caught it in time!

Electrical Panel Issues

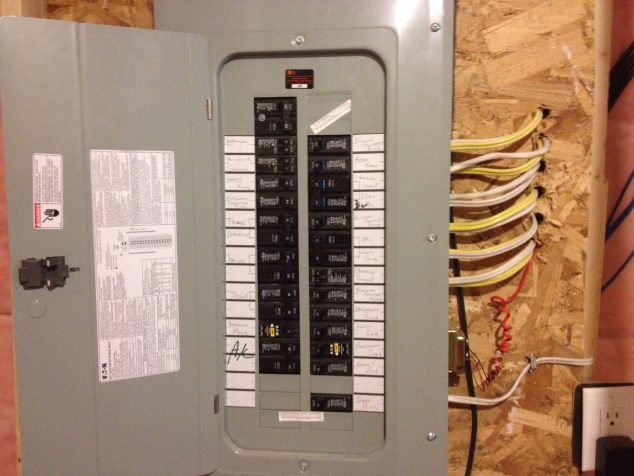
There can be issues in your electrical panel with the electrical wiring systems. Some are very noticeable while others are not


Electrical Wiring Basics

Home wiring is not something to fool around with. It is literally a life and death matter. Faulty wiring can lead to personal injury and electrically caused fires, both of which you want to avoid at all costs. In order to ensure your home wiring is done correctly, there are a few basics that you need to be aware of.

No Power = No Trouble

The key to safe basic house wiring is always keeping in mind that electricity packs a big, and deadly, punch. Even the most qualified electricians risk their lives if they don’t follow basic safety procedure. The best preventative measure you can take, whether you’re installing basic electrical wiring, or just examining the wiring you do have, is to always make sure the power is turned off from the get go. Whether you’re re-wiring your entire home or just replacing a faulty outlet, be sure to take a trip to the control panel and cut the power to the area you’re working on.

Know Your Electrical Code

With electrical work there is never an excuse not to follow rules and regulations. As mentioned before, electricity can be a dangerous animal if it isn’t treated properly. Your locality’s codes and regulations regarding residential wiring have been put in place for a reason: to protect you, the homeowner. Anytime you are working with basic house wiring, study up on standard procedures so you don’t put your family or yourself in jeopardy. And if you’re undertaking a major home wiring project, get familiar with your local inspector. Don’t view them as a hurdle to overcome, but as a valuable resource you can draw on to get the job done right.

Components of Basic Electrical Wiring

Besides safety considerations and regulations, the other thing you want to familiarize yourself with is the make up of your home wiring.

Service Entry. This refers to the point in your home where your electrical service goes from the main grid into your home. Your service entry is critical and there are a few things to keep tabs on. First of all, make sure any entry lines are at least 10 feet above the ground, inaccessible from windows, and free of obstructions such as tree limbs. Besides that, make sure your service entry is properly installed so no water can penetrate the access point.

Call in an Electrician

With most home improvement jobs you can do it yourself with a little elbow grease and patience. Electrical work is one of the exceptions. Unless you’re experienced in home wiring, you don’t want to do this job yourself. The safety risks are high enough that they greatly outweigh an electrician’s rate.


Home wiring

Homes typically have several kinds of home wiring, including Electrical wiring for lighting and power distribution, permanently installed and portable appliances, telephone, heating or ventilation system control, and increasingly for home theatre and computer networks.

Typical features

In new home construction, wiring for all electrical services can be easily installed before the walls are finished. In existing buildings, installation of a new system, such as a security system or home theatre, may require additional effort to install concealed wiring. Multiple unit dwellings such as condominiums and apartment houses may have additional installation complexity in distributing services within a house.

Power and telecommunication services generally require entry points into the home and a location for connection equipment. For electric power supply, a cable is run either overhead or underground into a distribution board in the home. A distribution board, or circuit breaker panel, is typically a metal box mounted on a wall of the home. In many new homes the location of the electrical switchboard is on the outside of the external wall of the garage.

Power point

Power points (receptacles, plugs, wallsockets) need to be installed throughout the house in locations where power will be required. In many areas the installation must be done in compliance with standards and by a licensed or qualified electrician. Power points are typically located where there will be an appliance installed such as telephone, computers, television, home theater, security system, CCTV system.

Light fittings and switches

The number of light fitting does depend on the type of light fitting and the lighting requirements in each room. The incandescent bulb made household lighting practical, but modern homes use a wide variety of light sources to provide desired light levels with higher energy efficiency than incandescent lamps. A lighting designer can provide specific recommendations for lighting in a home. Layout of lighting in the home must consider control of lighting since this affects the wiring. For example, multiway switching is useful for corridors and stairwells so that a light can be turned on and off from two locations. Outdoor yard lighting, and lighting for outbuildings such as garages may use switches inside the home.


Tricks for Running Wiring Through Your Walls

When it comes to residential electrical work, most people just call up an electrician without a second thought. And for good reason – working with electricity can be difficult and dangerous if not done properly. However, there are some simple jobs that amateur electricians can perform on their own if they have basic tools and experience. Read on for tips on how to run electrical wiring behind your walls without tearing up your home.

Get Started as a DIY Electrician

To get started, you’ll need a stud finder, a flex bit for your drill and a glow rod to pull the wiring through the holes you make. Before you start drilling any holes or messing with wires, you’ll need to decide where you want the wire to emerge from the wall or ceiling. Then, use the stud finder to ensure that you have a clear passage between the spots where you want the wire to enter and exit the wall. If you discover any crossbeams in the way, you can avoid a lot of work by adjusting your location to a more open area, unless it’s absolutely necessary that you pull the wire through to that exact spot.

Fishing the Wire Through the Wall

Now it’s time to actually fish the wire through the wall. If you tie a string to the drill bit, you can pull it back up to the entry point and use it to help thread the wire to its destination. This is where the glow rod comes in handy – you can attach it to the wire and help push or pull it through any tricky areas. As a bonus, the light from the glow rod helps you find your way behind the walls.

Expert Electricians to the Rescue

Once you have the wire where you need it, the difficult part begins – connecting your outlet or fixture, and adding the wire to one of the circuits in your home. If you are unsure about any step of the process, don’t hesitate to contact an expert electrician to come lend a hand


Common Electrical Problems Around The Home

FREQUENT ELECTRICAL SURGES

Electrical surges can be caused by anything from lightning strikes, damage to power lines, faulty appliances and bad electrical wiring in the house. While an actual surge only lasts a microsecond, frequent surges can damage the electrical components connected to your home, degrading their life expectancy significantly

SAGS AND DIPS IN POWER

Like electrical surges, sags and dips in electrical supply can often be attributed to devices connected to your power grid that are faulty or made with substandard materials, and draw a lot of power when they are turned on.

LIGHT SWITCHES NOT WORKING PROPERLY

Dimmer switches that don’t adjust light properly can often be attributed to shoddy workmanship or sub-standard products.

CIRCUIT BREAKER TRIPPING FREQUENTLY

High wattage items like microwaves and hairdryers can trip circuit breakers, particularly when other power consuming items are used on the same source. A circuit breaker is designed to protect you and your home, so when it does trip, that’s a sign it’s doing its job.

CIRCUIT OVERLOAD

One of the biggest causes of frequent circuit breaker tripping is the overloading of power boards. Most homes and apartments, even newer ones, don’t have enough power points to cater to, for example, a complete home entertainment unit setup. If circuit breakers in your home are tripping frequently

How To Get Rid Of Silverfish

WHAT ATTRACTS SILVERFISH TO YOUR HOME?

Silverfish are fast-moving, nocturnal insects that have many of the same habits as cockroaches. Like cockroaches, silverfish can trigger allergic reactions in some people, but are primarily nuisance pests that don’t bite and are not likely to spread pathogens that cause disease. However, they can contaminate food, damage paper goods and stain clothing, so you definitely don’t want them hanging around your home

Moisture

Silverfish are sensitive to moisture and need high levels of humidity (above 75 percent) to survive, so they’re attracted to humid, damp conditions. You can find often find silverfish in bathrooms, kitchens, laundry rooms, garages and cabinets. They can stray out of high humidity areas for a short period of time, but in general, they need higher humidity

Warm, dark places

Silverfish typically prefer dark hiding places with temperatures between 70–90 degrees

Carbohydrates and protein

Silverfish eat carbohydrates like flour, rolled oats and starches in cardboard boxes, paper, book bindings, glue and insulation. They also eat protein, such as dried beef and dead insects.

Reduce moisture

Repair any leaky pipes and faucets. Use a dehumidifier in damp areas to help reduce water condensation and humidity, and use a ventilation fan when you take a shower or are cooking. Keep gutters and downspouts free of debris, and grade your landscaping so water drains away from your house.


HOW TO GET RID OF SILVERFISH

Figuring out how to get rid of silverfish can be frustrating because they prefer scurrying around in the dark and are quick to hide when you turn on the lights. This guide explains ways to get rid of a silverfish infestation. You’ll learn what’s attracting them to your home, plus which essential oils and natural ingredients will get rid of them, and how to make traps to kill the ones you don’t see.

WHAT ARE SILVERFISH?

Otherwise known as “fishmoths,” silverfish are about 1/2 inch long with a scaly appearance, and range from pale silver (young ones) to a dark silver-blue (old ones). Although they don’t live in aquariums, their bodies are shiny and wriggle, making them resemble fish quite a lot. Unlike fish, however, they have an exoskeleton along with two antennae on their heads and three prongs on their tails.

IF YOU’VE SEEN ONE, YOU’VE GOT MORE

Silverfish are rapid breeders. Females can lay between 2 and 20 eggs each day throughout the year, and their larvae reach the adult (breeding) stage in three to four months. In other words, thanks to their rapid life cycle, one male and one female silverfish can create a nasty infestation in a couple of weeks.

WHERE DO SILVERFISH LIVE?

Silverfish prefer dark, damp, moist areas — as do a variety of other household pests. Fortunately, this means that your efforts to get rid of them will also kill off many other bugs in your home, too.

Toss the trash. Toss old newspapers and magazines, transfer dry foods from cardboard boxes to canisters and get rid of paper bags or empty boxes you’ve let pile up


How to Deal With a Silverfish Infestation

Silverfish control is the only way to battle an ongoing silverfish infestation in your property. While if you’ve noticed the bug in your home means that you’re probably too late to prevent a silverfish population from settling in your home.

Humid areas attract them, and if you haven’t taken the proper measures to keep silverfish outside, then your home is prone to an infestation. Here’s everything you need to know about the silverfish bug.

Silverfish have two long antennae on their head, followed with a body that has no obvious segmentation. While they have short and thick legs, silverfish bugs are capable of moving quite fast. The origins of their name are said to come from their rapid side-to-side movements, resembling a fish.

Reproduction

Silverfish reproduction habits differ from species to species, however, they all have one thing in common. All silverfish bugs go through love dances before mating. As for laying eggs, silverfish bugs either lay a few eggs every few days or lay eggs in clusters of two to 20 per cluster. The eggs are elliptical and measure around one millimetre in length.

Habitat of the silverfish bug

Silverfish bugs prefer dark and humid areas like basements, kitchens, bathrooms and even attics. They are also pretty tough and can live in any climate, although they won’t thrive.


How To: Get Rid of Silverfish

Did you know that if you store them in a dark, damp place, your most valuable possessions—rare books, important papers, and designer clothes—are in danger of being eaten by a sly, silver marauder? Read on to learn how to rid your home of silverfish, ravenous pests with insatiable appetites.

Don’t let the name fool you: Silverfish are nothing like the goldfish you nurtured as pets in your childhood bedroom. Whereas the latter swim placidly about their aquarium dwellings, the former lurk in the dark, moist corners of your home, munching on everything from paper goods and fabric to adhesives and mold. Named for their glassy, metallic appearance and slithering style of movement, silverfish are wingless, antennaed household pests whose ancestry stems back millions of years, predating even the dinosaurs. Given their lineage and history, it’s safe to say that silverfish are a tenacious species. Eliminating these resilient critters from your home may not be quick and easy, but with patience and persistence, you can get rid of silverfish using the following tips and tricks

NATURAL MANAGEMENT

Looking for a nontoxic way to get rid of silverfish? You have at least a couple of options. Before running out to make any purchases, however, first experiment with the contents of your kitchen cabinets. Strongly scented herbs and spices have been known to repel silverfish, so try leaving out generous helpings of cinnamon sticks, bay leaves, or whole cloves, or strategically placing sachets filled with dried rosemary. If, despite your efforts, silverfish remain in your home, move on to one of the more aggressive treatments described below

BAIT-AND-TRAP METHOD

There are many pros to natural pest management. But if there’s one downside, it’s that you must take it on faith that your chosen treatment has been successful. You typically don’t get the satisfaction of seeing bugs dead on the floor, so you never know for sure whether the issue has been resolved. If you’re not squeamish—and if you’re dealing with something short of a full-blown infestation—consider preparing one or a series of traps. That way, you can know for sure whether or not you’re making strides

CHEMICAL REMOVAL

Look out for any signs indicating that your problem with silverfish has gone from minor to major. Inspect surfaces for crusty, cast-off skins and tiny, pepper-like feces. Likewise, search such things as wallpaper, boxes, newspaper bundles, and book bindings for small scrape marks and ragged edges—either or both of which suggest active feeding. Even yellowish stains on clothing or furniture upholstery can mean that silverfish are attacking your home at night, after having spent the daylight hours in dormancy. To match an aggressive infestation with an aggressive treatment, seek out a commercial pesticide formulated to treat silverfish


Home Pest Control: Silverfish Identification, Prevention, and Removal Tips

silverfish are small, wingless insects found throughout the U.S., often in residences. They are thought to be one of the oldest insects in existence. These bugs have been around for 400 million years, which is altogether 100 million years before the existence of dinosaurs. Although harmless to humans, silverfish can damage many starchy materials and items within the home. Learning how to prevent and get rid of silverfish is important information for all homeowners to know.

Silverfish infestations can be daunting because they reproduce quickly, can go for long periods without eating and come out only at night. Silverfish damage household items people don’t often look at or think about, like old books stored in basements and seasonal sweaters tucked away in the garage. This means an infestation can get worse over many months before a homeowner will notice. When the infestation is discovered, it can be hard to tell if remediation efforts are working. Worst of all, many traditional pest control poisons have no effect on silverfish

Silverfish are slender and lithe. They have a wide head and abdomen plus a narrow, pointed back end. They’re silvery gray, often shiny, and have six legs, which gives them a fragile and delicate appearance. Most people identify silverfish by their double antenna and three long appendages on the side of their bodies opposite their head. These three long appendages coming from the rear look like additional antennas

Silverfish can be found in many parts of the country and in different environments. However, silverfish are most commonly found in dark and damp locations. Inside a home, silverfish are found in basements, bathrooms, attics, garages and kitchens. Damp clothing and paper attract silverfish, so they’re often found in homes with a lot of clutter, starchy materials, and/or books

Silverfish have some interesting adaptations, possibly because the species is so ancient. The following characteristics make silverfish different from many other species of insects.

Determining A Kitchen Remodelling Budget

Tips to Keep You From Hating Your Kitchen Remodel

Kitchen remodeling sits at the top of many homeowners’ wish lists, and for good reason: If properly done, a renovation makes the kitchen more attractive, improves its efficiency, and raises the resale price of your home

Set a Budget

If you’re planning to renovate your kitchen completely, be prepared to pay about 10% or 15% of your home’s current value. That’s no arbitrary percentage; it’s a budget that ensures that the quality of your improvements stays in line with your home’s worth. Although spending too little is a concern, it’s equally important to avoid overspending. Be sure to allow leeway for surprises. Who knows what plumbing or wiring nightmares lurk in the walls behind those old cabinets?

Size Matters

Are the cooks in your household taller or shorter than average? Careful shopping and strategic design can make their lives much easier without making your kitchen overly specialized. For example, manufacturers recommend installing a hood 30 inches above the cooktop—in other words, right in the face of a six-foot-tall cook. Luckily, there’s a simple solution: Most hoods work just fine if mounted slightly higher. The lesson is that no matter how lovely something looks on the drawing board, you must account for the lifestyle and physical characteristics of the people who will actually be using the kitchen.

Focus on Lighting

In the hardest-working room of your house, don’t underestimate the benefits of living with neither shadows nor glare. Use a mix of fixtures to layer light of different types—ambient, task, accent, and mood

Indulge (Some of) Your Whims

Maybe you’re right on top of the latest trends, or maybe you love bright colors. Remember, materials and colors that look fantastic in a sample-size swatch might very well appear over- or underwhelming in a larger dose. Resist the temptation of going over the top with busy tile patterns or purple appliances. Instead, integrate the design elements you love as accents, not centerpieces. Otherwise, you run the risk of alienating future buyers who don’t happen to share your idiosyncratic style sense.


Common Kitchen Renovation Mistakes to Avoid

While a significant expense for most homeowners, renovating your kitchen is also an investment that can last you for years to come and may even increase the overall value of your home. Therefore, there are a few tips you’ll want to keep in mind before you embark on your renovation journey—as well as a number of common mistakes you’ll want to try and avoid. Doing so will help make your time, effort, and money well worth it.

For starters, plan your kitchen accordingly. By this we mean take some time to consider your family’s needs and your lifestyle. This will help ensure everyone can get the most out of the space. Ask yourself how often you cook, what appliances you would like to dedicate extra time (and money) investing in, and how much storage you consider essential. Perhaps the kitchen is your family’s main space for socializing and entertaining, and sometimes even doubles as an after-school homework zone. In this case, you may want to pay extra attention to your seating choices and counter space, or maybe dedicate certain areas to serve more than one purpose

Going It Alone

Even if you’re the DIY type, make sure to consult a kitchen design expert before starting your project. A professional will be able to help fine-tune your remodel plan, offer tips and advice, and maybe even recommend some ideas you hadn’t already considered.

Overlooking Storage Details

Don’t skip over the seemingly small add-ons and storage features, like additional drawer dividers, or cabinet expansions like pantry pullouts and lazy Susans. These details will not only increase your kitchen’s storage efficiency, but will also save you money as they are much more costly to add on down the road

Forgetting Your Workflow

When planning you’re remodeling, remember your kitchen’s busiest areas: the sink, stove, and refrigerator. Make sure these areas and appliances are in an efficient location that is relevant to one another. Many designers refer to this as the kitchen “work triangle”.


Kitchen Remodeling Guide

Hey, have you heard the one about the 36-inch pro-style range that ripped the molding off the back door on its way into the house? Or the poured-on-site concrete countertop that cracked three months after installation? Or maybe it was the contractor who was paid in advance, promptly skipped town, and was never heard from again

Yep, we’ve heard those stories, too. Let’s face it, in a nation where home renovation long ago surpassed baseball as the Great American Pastime, kitchen nightmares are a dime a dozen — and anyone who’s ever traded Formica countertops and a Harvest Gold fridge for soapstone and a stainless steel side-by-side knows exactly what we’re talking about.

Finding (and Holding Onto) the Best Pros

Kitchen remodeling is at the top of homeowners’ wish lists. It is also, according to attorneys general across the country, a leading source of consumer complaints. Recommendations from friends are the best place to start your search for a qualified contractor. But before you make a decision, keep these caveats in mind

They’re only as good as their last job. “General contractors often win jobs based on their good reputations,” explains architect Dennis Wedlick, author of Good House Hunting: 20 Steps to Your Dream Home. “But circumstances can change. When the contractor switches subcontractors or laborers, quality can be affected.” Ask your top three candidates to supply references, and follow up with the most recent ones

What you see is what you get. In addition to completed renovations, try to visit a job in progress. You can learn a lot about a contractor’s commitment to quality and safety by seeing for yourself how clean the site is and how carefully the drywall is hung and taped


Kitchen Remodeling Guide: Tips & Advice

Hiring a Kitchen Remodeling Contractor

Redesigning and renovation of kitchens and dining rooms are the most popular issues among the homeowners. Finding the right contractor is one of the trickiest things for dummies. Ask your experienced friends and neighbors about their successes and kitchen remodeling nightmares. Browse through the forums and web reviews. Here are the things you should bear in mind while seeking for a professional

These are the three R’s of successful communication with a contractor. Offer the workers some soft drinks or coffee for refreshment. Don’t be on the way in the process of remodeling, especially in the kitchen and make your children and pets do the same to be responsible for calm renovation process. Be respectful and don’t talk politics and family relationships issues. Following these three simple rules will make your mutual communication flowing in the process of kitchen remodeling

If You Do Kitchen Remodeling Yourself

The DIY option is never prohibited and you can easily deal with kitchen remodeling on your own if you have a bit of experience and certain skills. This part of the guide is devoted to handy homeowners willing to do the renovation with their own hands. The first thing you need to remember is that all materials you need should be preordered and delivered on time before you start the demolition. Otherwise, you’ll have to cope with the kitchen under construction for weeks or even months. Do you have the materials ready? OK, let’s pass on to the first step you can beat yourself and save money on kitchen remodeling.

Speaking of the Cabinets…

Basic stock cabinets are perfect for fast kitchen remodeling. They are cheap, versatile and easily installed. They’re almost always in stock and generally delivered at once. Thanks to their simple look, their average cost is low. The only disadvantage is that your choice of designs will be very limited. If you’re a bit more sophisticated homeowner, you can try semi-custom kitchen cabinets presented in a wider variety of styles. That’s a pricier option, but you’ll have a chance to add fancy elements to your kitchen remodeling overall design: glass doors, moldings, and side panels. Besides, you’ll get a variety of coloring options. Such cabinets are generally preordered.

Materials

If you’re limited on budget, consider the right pick of material. There are several options available: Laminate. That’s the cheapest option. Budget countertops are also manufactured from the laminate. That’s a neutral naturally friendly idea. It is released in flat panels and cannot be reshaped. However, if you’re devoted to simplicity, these sleek minimalistic laminate panels will look contemporary and neat. Vinyl. Produced from the same material as laminate. It tightly wraps the cabinet doors providing you with more design options. You get attractive kitchen cabinets with simple maintenance for a moderate price.


What I wish I’d known before my first kitchen renovation

After years of dreaming about it, I finally renovated my kitchen last spring. Since it was my first renovation project, I put my journalist cap on, did extensive research, and asked everyone I could think of about their kitchen renovation experiences. While I learned some lessons the hard way, in the end, I got exactly the kitchen I wanted—one that includes a dishwasher-garbage-sink work triangle (life altering!), a giant island, and a heated tile floor (I cry with joy every morning when I walk on it).

Mixing and matching pricey items with less expensive ones, as I did, should be part of any renovation budget strategy. For example, I went super-basic on the refrigerator and dishwasher so I could go big with a six-burner, restaurant-quality range, and I opted for manufactured quartz over natural marble so I could upgrade to modern matte black cabinets

Get professional design help.

A kitchen designer will know tricks you won’t, but ask about how they charge: Do they bill for the design plus a markup on everything you buy, and can you order things on your own to save money? (Ask your contractor the same questions.) Also, check for design help in unlikely places: After three missteps on the design front, I discovered that my local building supply store, Riverhead Building Supply in East Hampton, New York, had a kitchen design center, and their design was free and amazing (thank you again, Cori Schramm!). I ordered mid-priced, semi-custom cabinets—and my countertops—there, and I was able to buy everything else (often on sale) on my own at other stores.

Accept that living without a kitchen will be highly unpleasant.

Each morning, as I squatted at the bottom of my living room stairs to brew and pour coffee, I cursed not having a kitchen. But an advance demolition of the old kitchen is critical because it allows for the most precise measurements for the new one. “You’re building cabinets for the space you have,” says California-based designer Tim Clarke. “You want to maximize every inch, learn where hidden pipes might be so that you can remove, and find unforeseen problems early while they can be addressed.”

Choose your appliances and sink early.

Appliances have big implications on layout. When planning, don’t just measure their width: Check the depth and leave clearance for circulation around door openings, including the side of the fridge, which often needs to be up to three inches to open interior drawers fully. Also, don’t skimp on ventilation: People forget the range needs a vent, or they underestimate the strength it needs (a heavy-duty range requires a heavy-duty hood!). Shop for your sink early too, as it’s just as important as your appliances. My huge undermount Franke 60-40 split stainless steel required me to move the dishwasher from its original location—an important early-stage decision. Find an appliance store that will let you buy early but will hold them until you’re ready to install, because appliances go in last.

Must Know How To Choose Good Flat Roof

Flat Roof Maintenance Tips

Flat roofs last approximately between 10 to 20 years before they need to be replaced.  How do you get your flat roof to last till 20 years – it’s quite simple – you just need to regularly maintain it.  Your flat roof can have a much longer life span, provided you look after it through regular maintenance (removing debris, fixing leaks and ponding, etc).  Maintaining a roof will involve some costs,but it will save you a lot of money in the long run, as it will last longer -pushing a roof replacement further away

Look for Debris

Some debris can be found on a roof usually after a storm. Debris can scratch, puncture or cause serious damage to your roof so it needs to be removed immediately. You should inspect for any visible damage when removing debris

Repairing Seams & Membranes

Seams are where 2 pieces of roofing material are adjoined. Both seams and membranes can be vulnerable to leaks, specifically in places on the roof that have accessories built into it such as air vents, skylights and air conditioner units

Replacing the Flashings

Flashings are installed into areas of the roof where where two opposing surfaces meet such as parapet walls. These areas require the extra protection that flashing provides.They help prevent water from leaking through the vulnerable areas. Over time, flashings can become loose or deteriorated from excess exposure to moisture and will need to be replaced.

Clearing Clogging

Clogging may occur in drains, vents and scuppers,especially after storms. Scuppers allow water to run off the roof, directing water to flow from the side of the roof down into a drainage system. All drains, scuppers or gutters need to be kept clear


How to Design a Flat Roof That Won’t Leak

The archetypal flat roof, even today, is largely associated with the mid-century modern aesthetic. From the outset, a building is deemed elementally minimalist based on its elongated form and perfectly linear roof. Architects are still attracted to the elegance that flat roofs bring to a piece of architecture, and for good reason. Set a mini McMansion-like suburban home and its steeply pitched roof against a low-lying, glass-clad modernist masterpiece and most design enthusiasts — architects and non-architects alike — would agree that the latter is a purer architectural form.

This said, even with contemporary technology, flat roofs aren’t easy to design with success. If the fundamental job of a roof is to cover a space and prevent water from seeping inside, then the simplest and most elemental roofing design would be heavily slanted. That’s why flat roofs — which are actually slightly pitched — must be detailed and constructed with the utmost precision. Here’s how to do it

Cold or Warm?

First, you have to determine how shallow a slope you can get away with. Flat roofs are typically designed with a pitch of 10 degrees or less. According to the International Code Council, the minimum slope for water runoff is ¼ inch per 12 inches. Some local codes take it a step further allowing a slope of only ⅛ of an inch per foot. When detailing construction documents, it’s imperative that architects specify the exact pitch of their roof design.

Second, you must be aware of the two classifications for flat roof constructions: cold and warm. These types are based on the positioning of the thermal insulation. To keep the interior dry and unaffected by the elements, the warm deck roof method is usually recommended over the cold.

To put together a warm deck roof, it’s important that the insulation be positioned above the structural deck — the layers that make up the ceiling. Zero ventilation space is required, and the construction appears stacked and compact. Above the insulation, a bitumen felt underlayment is torched on to shed water and protect the materials below. This is known as a warm-deck sandwich roof. An inverted warm deck roof can also be installed in which the insulation boards are set on top of the structural deck and waterproof membrane.


Maintenance guide to avoid flat roof repair

A flat roof is classified as any roof that has a pitch of less than 15 degrees and remains a very popular choice for many homeowners when getting a conservatory or house extension. Flat roofs are unobtrusive, affordable and cheaper and easier to maintain than traditional roofs. However, because of the use of felt, asphalt-based and other similar materials, insurers are often uneasy about insuring this type of roof because of concerns over their longevity, especially when compared with more traditional slate, tiled or more modern EPDM roofs. Which is where flat roof maintenance comes in… Unless you approach a specialist non-standard home insurance broker, most insurers will struggle to insure a flat roof property due to concerns with their endurance

Depending on the quality of the original installation and continued maintenance, flat roofs can in actual fact easily last for up to 50 years at a time before needing to be replaced. This lifespan is almost as long as a tiled roofs, which themselves can last for up to 60 years.

Life span will also be dependent on the flat roof materials used and you will generally find that felt or asphalt-based roofs are less durable compared to slate or more modern materials such as EPDM

By carrying out regular checks and flat roof maintenance, you can make sure that your roof doesn’t suffer from any major damage or excessive wear and tear which could affect its performance, allow in damp, draughts or lower its level of insulation

It is typically recommended that you check your roof every spring and autumn, as well as after particularly harsh weather conditions, such as storms, strong winds and heavy snowfall.


Help finding the best flat roof material and how to get it insured

If your property consists of either a full or partial flat roof then you will be well aware of the need for continued maintenance in order to prolong its lifetime, as well as the need eventually to replace the covering over time. Materials have developed and advanced over time, but what is the best option? Here are some details to help you in making the most suitable choice for you individual situation as well as how to insure your flat roof once it is laid.

How many years does a flat roof last?

Most traditional flat roofs are made from either mineral felt or asphalt and will have a maximum life span of between ten and 15 years. Unfortunately though they have a bad reputation due to their propensity to leak or become damaged through pooling water. However, if you keep a roof well maintained there is no reason that this cannot last much longer. In general a flat roof these days tends to last about 20-30 years plus before it needs replacing. With the introduction of plastic and rubber materials this can be even longer, so perhaps replacement for your flat roof would be required up to a maximum of two-to-three times during your lifetime depending how long you are at a property

What are the options for flat roof materials?

If you want to improve on these traditional options then you may want to consider EDPM or TPO flat roofing options. Both EDPM and TPO are types of rubber which tend to have a much longer lifespan than the traditional materials. TPO is less-widespread and a comparatively new product but is more easily heat-weldable. There are also the options of Fibreglass, Lead, Copper, and Zinc which are being used more regularly and are all considered much harder wearing.

Felt roofing

Bitumen felt roofs are applied in a three layer system including a vapour control layer, a reinforced felt layer and cap sheet. These three layers are welded together and hence the material is often called ‘Torch-on felt’. This type of flat roofing should never be attempted to be fitted through DIY installation due to the danger and expertise required, and you should check that your contractor carries the correct insurance to work with a hot flame. Most felt roofs are guaranteed between 10-20 years, but if treated well and well maintained they can last longer.

EPDM Rubber roofing

These rubber roofs can often be installed in one complete layer without the need for joins, depending on the size of the roofing area. EDPM is extremely lightweight, elastic and tough so a well installed rubber roof can be a very good option. Most EDPM roofs are guaranteed for 30 years upwards meaning they are very hard-wearing and can withstand foot traffic due to the incredible ability for expansion and contraction. Rubber roofs, such as EDPM, are very durable and waterproof when in good condition, however they can be easily damaged or vandalised.


TIPS TO GET YOUR FLAT ROOF READY FOR SPRING

REMOVE DEBRIS

One of the things that makes Toronto such an attractive city to live in is the many beautiful old shade trees that line residential streets, parks, and ravines. But all of this greenery means that debris builds up quickly on flat roofs across the city, and the first thing you need to do once the snow has finished melting is collect all the debris that has gathered over the winter

CLEAN ALL OUTLETS

Contrary to popular belief, a flat roof is not actually flat. Flat roofs are designed to slope gently towards drainage outlets either on the sides of the roof or in the centre. As any Toronto roofer will tell you, keeping these drainage outlets from clogging is the key to keeping your flat roof from leaking.

CHECK FOR PUNCTURES

Once the roof is clean and the drains are in good working order, you’ll want to check the roofing membrane more thoroughly for punctures, rips, or tears. The type of membrane will vary depending on what kind of flat roof you have, but most Toronto roofing membranes are made from PVC Membrane, modified bitumen, or EPDM.

INSPECT PARAPET WALL SEAMS

One of the distinctive elements of Toronto’s older flat roofs is the parapet wall running along the edges of the roof overlooking the streets and alleys. These parapet walls are designed for safety and serve a variety of other architectural purposes as well (they also give the house a sharper and more pleasing profile)

INSTALL A FLAT ROOF DECK

Now that you have made sure that your roof is clean, your drains are not clogged, and there are no punctures or tears on your flat roof, you can start turning it into a summer oasis. But before you haul up the patio chairs and the flower boxes, remember that protecting your flat roof from damage from foot traffic is essential if you want to keep it in good working condition for years to come

Make Sure Do Electrical Upgrades Routinly

Electrical Upgrades for DIYers

Many homeowners who think nothing of tackling painting, carpentry and plumbing projects turn timid when it comes to electrical work. A little fear isn’t necessarily bad when dealing with electricity — it could keep you from making a serious mistake. But that doesn’t mean there aren’t electrical projects you can handle. All you need is an understanding of how the electrical code applies to your project and some instruction on making proper wire connections

Installing an exterior floodlight — the first of three three simple, do-it-yourself upgrades we’ll be covering — can be done on virtually any house. To safely guide you through this upgrade, we enlisted the help of electrical contractor Peter Eng, owner of Electrical Enterprises Incorporated in Litchfield County, Connecticut. It took him a day to complete all three projects. To facilitate your work, we’ve included photographs that outline the basic steps and illustrations that show all the wiring connections. Consult with an electrician if your home is wired differently than the ways illustrated.

If you’re still not feeling confident, here’s an alternate approach: Run cables, install boxes, and wire in switches and outlets, then hire an electrician to make the final power hookups and check for any code violations. (Most municipalities allow you to do your own electrical work, though you’re never allowed to wire someone else’s home.) Also, get the proper permits from your local building department before starting. It’s the law, and you’ll also get the benefit of having your work checked both at the rough-in stage and when it’s completed

Before starting work, turn off the power at the main service panel. Plug a lamp or circuit tester into the circuit you’re working on to confirm the power is off. Finally, if you have any questions or concerns, always consult with a licensed electrician or building inspector before you proceed. Electrical work isn’t difficult, but the consequences for not doing it right can be serious

Installing a Floodlight

Light up your life — or at least your backyard — with a floodlight. Our installation solves a common problem: A deck without adequate lighting for itself, a staircase, or the adjacent yard. The solution called for installing a two-lamp floodlight ($12) high up on the house wall. As with most electrical upgrades, this one relies on tapping into an existing circuit. If you’re not sure whether or not a circuit can support the upgrade, check with an electrician. An overloaded circuit is a fire hazard.


FIXING UP A HOUSE? ELECTRICAL UPGRADES WORTH YOUR MONEY

If you are upgrading a house, whether it be a fixer upper you have just moved into, a potential real estate flip, or you have simply finally gotten around to upgrading your own home, some electrical upgrades will be much more worth your time than others. Here is a quick guide to understanding some basic electrical upgrades, and a few tips for ensuring that you get the most bang for your buck

When prioritizing upgrades, the first priority should always be safety. While it isn’t glamorous, a safe electrical system is not something you can afford to skimp on. Some older systems use components which have been found to be unreliable. Alternatively, they may have been exposed to damage as a result of weather or aging. Your first priority when dealing with an electrical system which is in an unknown condition should be to hire a competent electrician to come and evaluate the current condition of the system. They should be able to give you a breakdown of any potential safety hazards which they find

Safety is important for a number of reasons. Obviously, no one wants to have themselves or their family exposed to electric shock. But electrical fires can be just as deadly, and can strike when you least expect it. Additionally, insurance can be hard to procure, or significantly more expensive if you have a damaged or not inspected electrical system. If you can assure your insurance company that the electrical system is in excellent condition and has been inspected and repaired recently, you can guarantee that your dealings with them will be much easier

Once you are satisfied that the electrical system is using modern electrical components, fits within the safety guidelines of the electrical code, and is not a large risk for causing damage, you can begin to assess where upgrades will be most beneficial. As is often the case, this will depend on things like the location of the house, the priorities of the owner, and the current economic climate. For example, if you want to save money spent on power, common upgrades can increase the electrical efficiency of the home. Installing new refrigerators, HVAC, and other large appliance can allow you to benefit from recent technological developments which have increased the efficiency of the technologies behind them. Similarly, making sure all of your wiring is well insulated, and that the circuits are appropriate for the load upon them can help to prevent electrical loss. Furthermore, installing electrical metering tools can help you better understand where your power is going, empowering you to take charge of your electrical expenditure.

While some older features will need to be replaced as part of the safety inspection, other older parts of a system might be merely inconvenient, or might be a lower safety priority. One way to increase the value of your home while also increasing its usability is to upgrade your electrical sockets. An ancient two prong plug might be more than a bit of an eyesore. When people cut off the third prong of their electrical device, they create a serious electrical hazard. It is much better to hire a trained electrician to install an upgraded socket which can interface successfully with whatever electrical device you are using. Similarly, there are options for GFCIs ( which are mandated in some settings) and child safety electrical outlets. Depending on your situation, it might make sense to install these in different locations. Installing these can be more complex than you realize, and it should not be attempted without significant experience. Proper installation will involve running wires from your main electrical panel to the outlet, and is much more involved than simply changing out the cover on the outlet.


Reasons You Need to Upgrade Your Home Electrical System

The electrical systems in a home are usually ignored by most people—until something goes wrong, at least. When a home electrical system suddenly fails, that’s when people start to take notice and try to find ways to fix it. However, it can pay to hire electrician services to make some electrical upgrades to your home sooner rather than later.

To Bring Your Home Electrical System up to Code

Building codes may vary from one year to the next, and new safety standards may have been implemented since your home electrical system was installed or updated last. Performing an electrical upgrade can help bring your home’s wiring back in line with current building codes

To Prevent Fire Hazards

When electric system maintenance falls behind, there is a risk that frayed wires and other issues can create fire hazards. So, one reason to upgrade your home electrical system is to minimize fire risks

To Meet the Power Needs of New Appliances

The average household consumes a lot of energy—and that amount is likely to rise as more and more modern technologies rely on electricity. In fact, according to data from the U.S. Energy Information Administration (EIA), “In 2017, the average annual electricity consumption for a U.S. residential utility customer was 10,399 kilowatt hours (kWh), an average 867 kWh per month.”

To Add New Outlets for Added Convenience

Here’s a common problem: you want to move your TV to a different wall, but there aren’t any outlets near where you want to put it. Maybe the house is old enough that electrical outlets weren’t a major concern or the designer had a specific layout in mind that you don’t want to conform to. Either way, the lack of electrical sockets is going to be inconvenient for your plans.


Electrical Upgrade Tips from a Commercial Electrician

Remodeling a building is an expensive undertaking, so if you have an elaborate plan on how to give your property a fresh new look, or are simply making upgrades to ensure your building is running as efficient as it can, you will want to make sure you have a commercial electrician on your team. Between having to move around your building’s electrical wiring, and understanding how much power your updated building will require, a commercial electrician is essential. If you are looking for a commercial electrician in Thurmont, or the surrounding areas, read on to learn more from ALC Weaver Electric.

Commercial Electrician or DIY?

It may be temping to have a friend, or unlicensed contractor, work on your building to save money and move the project forward at a fast pace, but this can lead to major issues down the road. It is essential to find a licensed commercial electrician as you begin to plan your upgrades so that they can be involved during the whole process

Upgrade with Smart Systems for the Modern Business Owner

More and more, businesses are turning to smart systems to partially automate their buildings. From automated lighting to smart thermostats, there are endless opportunities for your business to become more automated. In addition to the money-saving benefits of smart systems, they can work together to give a building a unique, and custom, look. Want to soften the lighting as the sun begins to set? Lower the blinds to block reflections for your customers? All of this is available with smart systems

Don’t Have a Solid Plan? Lean on Your Commercial Electrician in Thurmont to Help Create a Custom Layout

Do you know you want to make some upgrades but don’t know where to begin? Do you have some ideas but are overwhelmed by the idea of putting them into motion? Meeting with a licensed electrician should help ease your mind. Since they are used to working with building contractors, they are familiar with the amount of time (and money) that certain projects involve. They can help you understand better ways to lay out your space based on your current wiring, and they can work with you to create a plan based on your current budget.

Get in Touch With a Commercial Electrician in Thurmont to Start Your Next Project

ALC Weaver Electric’s commercial electricians are experts at working on commercial properties in Thurmont, Maryland, and the surrounding areas. If you need a commercial electrician in Thurmont, or the surrounding areas, click here to receive a free estimate for your project
 

When It’s Time for an Electrical Wiring Upgrade

The lights come on when you flip the switch, the TV works, and the refrigerator keeps food cold. That means the electrical wiring must be fine, right? Not necessarily. There may be times, especially if your house is more than 40 years old, when you need to upgrade electrical wiring for safety, or because the existing wiring no longer meets your family’s power needs.

Safety Issues with Older Wiring

Faulty wiring is the leading cause of residential fires, according to a 2009 study by the National Fire Prevention Association. And the older your house is, the greater the chances that the wiring might be outdated or unsafe

Be on the Lookout for Aluminum Wiring

Instead of the standard copper wire, many houses built in the 1960s and early 1970s have aluminum wiring, which is considered a safety hazard. “Aluminum wiring connections often loosen up over time,” says Greg Fletcher, a master electrician, educator, and author of several books on wiring. “That can cause overheating and possibly fires at receptacles when appliances are plugged in to them.” An inspection can determine whether it’s safe to leave the wiring in place. Sometimes the addition of copper connectors, called pigtails, at receptacles and circuit breakers can resolve potential problems.

When You Need More Power

Sixty amps used to be the standard for household power. Today, houses often need 200 amps to run air conditioners, flat-screen TVs, computer equipment, and all the other gadgets our parents and grandparents hardly imagined

Prepare to Open Your Walls — and Your Wallet

Upgrading electrical wiring is a big job, for one simple reason: All the wires are behind the walls. Every house is different and prices vary by market, but for a whole-house rewiring job, you’re easily looking at a bill of several thousand dollars. The vast majority of that is the labor involved to get to the wires, run new ones, connect them to every switch and outlet, close up the holes, and clean up the mess.


Must Learn To Make Move Out Cleaning To A New Place

Move Out Cleaning – Tips from Start to Finish

So, you’re moving house or moving country; either way, you’re moving out! The excitement of moving into a new house is one that no homeowner forgets, nor is the bittersweet memory of saying goodbye to an old home. Nevertheless, it has to be done and moving out is no walk in the park. What can make it easier though, are these move out cleaning tips

ORGANIZE YOUR PACKING FIRST

If you’ve already begun to move boxes to the new place, that’s great because the lesser stuff you have in the house, the easier it is to clean. If you’re planning to load the moving truck with all your stuff on moving day itself, we’ve got some suggestions for you. Try to devote one room for storing packed boxes so that the empty rooms can be cleaned first. Even if it means you have to clean one room every day, it beats having to clean the entire house in one day.

REMOVE DUST AND COBWEBS FROM CEILINGS

When you start cleaning an empty room, target the ceiling first. If you don’t have a long-handled broom, tie an old tee-shirt over your mop and use it to remove cobwebs from ceiling corners and wipe the entire ceiling to remove dust.

WIPE WALLS CLEAN

Use the same contraption you made to dust your ceiling, for cleaning your walls. Start from the top and make your way downward as you wipe from side to side. If your paint finish/wallpaper permits, gently rub away stains using a clean, damp cloth. Even if there aren’t any obvious stains, using a damp cloth to wipe all the walls will give them more life and look cleaner

SWEEPING AND MOPPING

With all the dirt and dust from the ceiling and walls now settled on the floors, it’s time to finish up cleaning the room by sweeping and mopping. Before you start mopping, keep the windows slightly opened in the room for quicker drying, and close other windows as the cross ventilation might blow dust and dirt from other rooms in to the cleaned one


Tips for Offering Move-In / Move-Out Cleaning Services

People and businesses are constantly on the move. The latest U.S. Census reports that there are over 327 million people currently living in the United States. Statistics indicate that almost 15 percent of the population moves annually. That’s over 49 million people packing their bags and relocating. This mass migration creates opportunities for cleaning business owners

As people and businesses move, they need their previous location cleaned and/or want to make sure their new setting is “work ready”. Cleaning companies can fill this niche for on the move businesses by providing what is known as “move-in/move-out cleaning”. It can be an ideal add-on service and a great way for your commercial cleaning company to make more money!

What are move-in / move-out cleaning services?

This type of service usually encompasses what we refer to as “deep cleaning”. Deep cleaning can include washing, wiping, scrubbing, and dusting pretty much everything that needs it. Windows, cabinets, walls, ceilings, floors, vents, fixtures, blinds, you name it; you probably will be cleaning it.

How do I find opportunities to provide move-in / move-out cleaning services?

A good place to start when looking for move in/out cleaning accounts is to contact commercial contractors or real estate offices. If you have been cleaning commercial buildings for a while, your clients will no doubt ask you to provide move in/out cleaning services. It’s also a good idea to spread the word to your clients that this is a service you provide.

How should I price move in / move out services?

The prices charged will vary depending on the type of facility you are cleaning, cleaning specifications, and deadlines. Prices range from $25 to $40 per hour. Again, this is dependent upon your cleaning company, your expenses and overhead costs, and your profit expectations.


Tips for Deep Cleaning Your Apartment Before Moving Out

First, Understand Your Apartment Cleaning Responsibilities

Our next installment in our apartment moving tips series covers cleaning tips. But first, it’s important to understand what’s expected of you when you move out. Talk to your property manager or landlord. Many times, professionally managed buildings will handle the cleaning and restoration of the apartment to prepare it for the next resident. Learning what you’re responsible for can also save you a good bit of money, as you may not have to hire a carpet cleaning company or other similar service providers. That will be taken care of as part of the management company’s apartment preparation process.

All Right — Time to Start Cleaning Your Apartment

Now, when we say cleaning, we don’t mean the standard weekend room-by-room wipe-down. We mean deep cleaning. We mean doing the things that you don’t typically do just to make the place presentable for guests. We mean that you’ll probably want a shower when you’re done.

When You Clean, You’re Helping More Than Just Yourself

Put yourself in this situation: You’ve found the perfect apartment You’ve signed a lease and are moving in. You walk into the elevator, arms loaded up with boxes, and ride up several stories to your new apartment. You can’t wait to see the view again. It’s been a month since you were here last planning the best use of the space.

When you get there, you unlock the door and walk in. Immediately, you feel dirty. Everything smells like a high school locker room. There are smudges on the wood flooring so pronounced that they look like spilled milk. The carpet in the bedroom is matted down and as cushiony as concrete. The bathroom looks like someone just used it, and the kitchen is looking like a health code violation.

This is an extreme example — one that a reputable property manager wouldn’t allow. But you get the point. Had the previous tenant bothered to deep clean, you wouldn’t be in this situation


MOVE OUT CLEANING CHECKLIST

You packed the dishes, de-cluttered the garage, hired the movers and signed the papers. Now what? Performing a deep clean before moving out is beneficial to both parties – especially if you have a security deposit on the line. However, move out cleaning is easy to neglect. After all, you have bigger things to worry about – like moving into your new home or apartment! Molly Maid offers flexible move in and move out cleaning services to ease the transition to your new home or apartment. Whether you need the entire house cleaned or just certain items on your move out checklist, Molly Maid can help. Download our printable move-out cleaning checklist

Move Out Cleaning

ow that the rooms are empty – or nearly empty – it’s time to get your home or apartment looking even better than it did when you first moved in. Many house or apartment contracts require a “broom-clean.” Others require a thorough checklist that covers everything from baseboards to the microwave oven

Move In Cleaning

Who doesn’t want a fresh start? A thorough move in cleaning gives new homeowners and tenants peace of mind knowing that their new living space has been scrubbed and disinfected from top to bottom. We always recommend performing a move in clean before you unload your personal belongings. This ensures that every inch of the room gets the attention that it needs.

How much does a move in clean from Molly Maid cost? It all depends on the size of your new home or apartment and the condition it is in. For the most accurate quote, call your local Molly Maid to discuss the details of your move in cleaning. Our staff can also create a personalized cleaning schedule to keep your new home or apartment as tidy as it was when you first moved in.

*This checklist is provided to help DIYers clean their own homes. It is not intended to reflect the steps taken by Molly Maid’s professional cleaning teams. Each franchise independently owned and operated. Services may vary by location.


MOVE-OUT CLEANING SERVICES

You packed the dishes, de-cluttered the garage, hired the movers and signed the papers. Now what? Performing a thorough clean before moving out is beneficial to both parties, especially if you have a security deposit on the line.

However, move-out cleaning is easy to neglect. After all, you have bigger things to worry about, like moving into your new home or apartment. Molly Maid offers flexible move-in and move-out cleaning services to ease the transition into your new space. Whether you need the entire house cleaned or just certain items on your checklist, our professional house cleaners are ready to help.

Move-out Cleaning

Now that the rooms are empty (or nearly empty), it’s time to make your home or apartment look even better than it did when you first moved in. Many apartment and house contracts require a “broom-clean” while others call for a detailed checklist that covers everything from the stove to the baseboards.

if not all, of the items on your checklist. We’ll take care of the move-out cleaning so you can focus on your move.

It all depends on the size of your home or apartment and the condition it’s in

Use Bathroom Remodelling Metode To Make Your Bathroom More Beauty

Things Nobody Tells You About Renovating Your Bathroom

Don’t assume your contractor is on the same page

When you’re functioning as the general contractor—or even working with a general contractor—you have to spell out every part of the plan, and never assume everyone is up to speed,” say the mother-daughter team behind Matriarchy Build in How to Avoid Rookie Remodeling Mistakes. “Someone we know had a contractor demo the wrong bath,” they add.

How much does a bathroom remodel cost? More than you think

Think you can remodel your bathroom head to toe for a couple thousand dollars? We hate to tell you: the average cost of a bathroom remodel was $11,364 in 2016, according to the National Kitchen and Bath Association (NKBA). A basic, low-grade renovation with less expensive materials or smaller swaps could run from $1,500 to $5,000, while a top-of-the-line, tip-to-toe renovation could run up to $23,000.

You may want to rethink that statement-making bathtub

You may be tempted to upgrade your bathroom with a dramatic freestanding bath. But it might not be the most practical choice going forward, particularly if you’re petite, hate cleaning, have an old rickety house, like to take long baths, or take more showers than baths. Read more about the merits of built-in baths (and showers) versus freestanding options in 10 Things Nobody Tells You About Clawfoot Bathtubs, as well as in Remodeling 101: Romance in the Bath: Built-In vs. Freestanding Bathtubs.

Flattering lighting requires planning

Don’t think you can install a few lights and call it a day: because bathrooms are sometimes small and/or dark and filled with mirrors (which complicates how light bounces around), lighting requires careful thought and placement. The simplest way to light a bath is a single diffuse light in the center of the ceiling. Have a bathroom that’s already pretty bright? A pair of wall sconces should be sufficient. Thinking about ceiling-inset downlights? Place with care: avoid installing directly over light-colored countertops (since those will reflect the lights), and place close to the wall over a vanity to maximize light when looking in the mirror. And if you spend a lot of time applying makeup, consider vertical fluorescent light fixtures on either side of the mirror. For more pro tips, see Remodeling 101: How to Install Flattering Lighting in the Bathroom.

Don’t forget to install accessible outlets.

You don’t want to get to the end of a renovation and realize you’ve forgotten to consider the outlets. Think of these outlet errors: you have to plug your hairdryer in across the room, and can’t see yourself in the mirror from there. Or, you’d like to keep your electric toothbrush charging at all times, but neglected to install an outlet in the medicine cabinet. Or, you share your bathroom with your spouse, but only installed an outlet on one side of the vanity. To avoid these mistakes, read Remodeling 101: Where to Locate Electrical Outlets, Bath Edition.


DIY Bathroom Remodel Ideas

Renovating a bathroom is no small undertaking. So before you start tearing up the tiles and picking out the tub, get a little advice from the people who make bathroom makeovers their bread and butter.

We polled contractors, designers, and other pros for their top tips and insider tricks for getting every detail right. Whether you’re on a budget or ready to pay a pretty penny, follow these DIY bathroom remodeling ideas and you’re sure to create the bathroom you always wanted

Radiant Floor Heating

Radiant heat beneath tiles makes them toasty underfoot. But you don’t need to have it throughout your house; you can simply add an electric mat to boost a bath’s existing heating system. It can take as long as 45 minutes to warm up, so put it on a programmable thermostat to chase away the chill by the time your alarm clock goes off

Tile Flooring Ideas

If you want an easy-care floor: Go for porcelain or glazed tiles, and avoid porous natural stone tiles like limestone. Unless sealed vigilantly, they’ll absorb drips and spills and become stained over time.

How Much Room Do You Need for a Half Bath?

Theoretically, you can fit a sink and toilet into an 11-square-foot spot and still meet national building codes. But for comfort’s sake, look for an area that’s 3 to 4 feet wide and 6 to 8 feet long. Check local codes for additional requirements, and be sure to check out TOH’s details on dimensions and clearances.


Ways to Save Money on Your Bathroom Remodel

Have a Plan Before You Start

Working with a designer or architect may seem like a pricey move right out of the gate for someone wanting to remodel their bathroom on a budget, but it is money well spent. Having a plan you’ve worked out with a professional will assure you that your design, budget and timeline are realistic, and it will give you a goal with a path to get there. “Hiring a designer saves you time and money in the long run, so you don’t make expensive errors,” says south Florida-based designer Meredith Marlow.

Keep Plumbing Where It Is

Another reason to work with a designer on your bathroom renovation: Using the existing piping will save you big bucks. Relocating utilities like the toilet and the bathtub are no small task: Designer Justin Riordan says it costs about $5,000 each time you move plumbing fixtures.

Mirror Frame-Up

Dress up that builder-grade mirror with a fantastic frame, and at a fraction of the price of sourcing a huge hanging mirror. A frame will also hide any age-related wear, says Karen Gray Plaisted, a Warwick, N.Y.-based home stager and decorator. “I often tell clients to add a frame around their mirror to hide the flaking that can happen around the edges, and to give it a more updated look,” she says.

Don’t Toss Money Down the Toilet — Update It

Here’s some potty talk you won’t want to miss: When remodeling your bathroom, consider replacing your toilet seat and lid instead of tossing out the whole porcelain perch. Just changing out these two tops can give your toilet a fresh look without buying a new unit, which saves you plumber installation fees, too.

Hit the Salvage Hard

Home decor blogger Anita Joyce found a large piece of salvage barn wood to serve as a shower curtain valance. It looks like a pricey piece and serves as a focal point, but it was definitely a budget item. Salvage can be intimidating, but if you start by checking out antique stores, flea markets, resellers and auctions, you’ve already got the idea, she says. You just have to go do it to really figure it out … and that’s how you score the really great items. You can also salvage and redo cast iron tubs, light fixtures, even sinks … basically anything that fits your style and you want to put the effort in to saving and making your own!


Must-Know Bathroom Renovation Tips

When is the right time to remodel your bathroom? Any time. If you plan to stay in your home, why suffer with outdated decor, an awkward layout, or inefficient fixtures? If you plan to move soon, a remodel might pay off in a higher listing price or a quicker sale. Here are five things to keep in mind when tackling a bathroom remodel.

Start a wish list.

Evaluate your existing bathroom — what you like and what you want to change. List features you’ve always wanted. Group them according to must-haves and nice-to-haves, and number them by importance. Tour model homes and showrooms, and scan magazines and websites to gather inspiration.

Establish a budget.

Whether you want to gut your bathroom and start from scratch or just make cosmetic changes, it’s important to know how much you want to spend before you start. Also set money aside for the unexpected, such as water or mold problems.

Call an expert.

Even if you’re planning a small-scale makeover or tackling some of the remodel yourself, consult a professional. Pros know what your budget can buy, and they provide solid advice on how to save and where to splurge. They can also help you avoid costly mistakes. Be sure to call in experts for plumbing and wiring, and always get more than one estimate for a job.

Get the biggest bang for your buck

Whatever the size of your bath, keep in mind that the more walls containing plumbing pipes, the higher the price tag. Working within a room’s existing footprint might not offer the ideal design solution, but it almost always saves money. Moving the toilet or the drain for the shower or tub can be expensive. However, if electrical or plumbing systems are outdated, it can be cheaper in the long run to gut the room and start from scratch. “The most important thing is to have high-quality installers,” says Linda Welch, a certified master kitchen and bath designer from Monroe, Michigan. Welch recommends spending more on installation than on products. Also, invest in items that can’t be changed easily, such as flooring, the tub, and shower, and don’t overlook practical features such as good lighting and storage.


Here’s Your Ultimate Guide to the Do’s and Don’ts of a Bathroom Remodel

Undertaking a bathroom remodel is both exhilarating and nerve-wracking. For many homeowners, it’s a status symbol and one of the first times they can bring a substantial personal touch to their home. However, it’s a sizable investment, one big enough to make most people think twice before diving in unprepared.

If you’re ready to remodel your bathroom, but need some help figuring out how to do it right, we’re here to help. Use the tips in this post as a guide for pulling off a successful remodel and you’ll have all the tools you need to bring your vision to life.

DO: Find design inspiration first

Every great home remodeling project — but especially those that come with a hefty price tag — must start with a plan. Before you start on the physical aspects of the project, like tearing up flooring or putting in a rain forest shower, have a firm idea of what you want your final product to look like.

DON’T: Forget to consider your budget

Once you have your inspiration in mind, it’s incredibly important to be realistic about your budget. Consider how much money you have to spend, as well as how much your ideal project would cost. Though it may not be the most pleasant task to undertake, looking at your finances will help you get a sense of which aspects of a renovation are most feasible for you.

DO: Keep high-end items neutral

Since bathroom remodels are such a huge expense, one of our favorite tips is to keep your high-end purchases as neutral as possible. In particular, we’re talking about things like tile flooring or shower design. Allowing these features to be more of a blank canvas will make it easier to alter your design as trends change and ensure that they have a broader appeal if you ever sell your home.

Must Learn How To Switches Installation

Do it Yourself Light Switch Installation

Changing a Light Switch

Homeowners may choose to replace or upgrade a light switch for functional or for aesthetic reasons. Changing the light switch is a simple and inexpensive DIY project.

Understanding how the switch is wired is the most important part. When you turn on a light switch, power goes to the light through the “hot” (black) wire and then back through the neutral (white) wire to the ground. The bare or green-wrapped ground wires serve as a backup to divert the power safely away in case of an electrical fault.

In most cases, two black wires will be attached to the switch’s two terminal screws. The white wires will be connected to each other but not to the switch itself; this connection is typically secured by a plastic wire nut. The ground wires will be connected to each other and attached to the grounding screw on the switch.

Turn Off Power

Turn off the power to the circuit at the circuit breaker or fuse box. You can double check to ensure that it was turned off by flipping the switch in an attempt to operate a light, and by using a voltage tester once the switch plate is removed to confirm that the wires are not charged.

Remove Switchplate and Switch

Use a flathead screwdriver to remove the switch cover, and a Phillips head screwdriver to remove the existing switch from the box.

Remove Wires From Old Switch

Use a screw driver to loosen the screws holding the electrical wires on the side of the switch, and then disconnect the wires from the switch itself. Pay attention to the wire colors and where they had been attached on the old switch, as you will be duplicating their placement on the new switch. Using needle nose pliers will be helpful while working in this small space. Keep the wires separated by bending them to opposite corners of the box. If the switch is grounded, remove the grounding wire last.

Attach New Switch

There will be three wires: one black, one white, and a separate ground wire that may be bare copper or is sometimes wrapped in green. Inspect the quality of the wires. If any of the wires seem weakened, trim and re-strip the end of the wire to meet your needs.

Identify the three different colored wires, and attach the new light switch to the wires in the same way they had been attached to the old switch. If your wires are solid copper, create a loop in the end of the wire with the pliers and guide it around the screw on the side of the switch. Tighten the screw, ensuring that the wire is securely held beneath the screw and is not splaying to the perimeter of the screw. If your wall wire is composed of a group of smaller wires, use the pliers to gently twist the ends of the wires together to make them “whole,” and then follow the same direction.

Attach Switch and Reinstall Plate

Once the wires are attached, you can gently fold any excess wire and compress the dimmer into the electrical box. Move slowly to ensure the wires don’t loosen or break if you have to force the switch into position. Tighten the screws to secure the switch to the box, and fit the switch plate. You may find that tightening or loosening the switch in the box by a few small twists of the screw driver makes a difference with how well the plate fits over the box. Once the cover is in place, turn the breaker or fuse back on, and check your handiwork.


Switches vary in both the number of poles and the number of throws.

Most switches have one or two poles and one or two throws. This leads to four common combinations: Switches with more than two poles or more than two throws are not commonplace, but they do exist. Rotary switches lend themselves especially well to having many throws. For example, the rotary switch in a multimeter typically has 16 or more throws, one for each range of measurement the meter can make.Here are a few other points to ponder concerning the arrangement of poles and throws:

  • A common variation of a double throw switch is to have a middle position that does not connect to either output. Often called center open, this type of switch has three positions, but only two throws. For example, an SPDT center open switch can switch one input between either of two outputs, but in its center position, neither output is connected.


Replace an Outlet

Replacing an electrical outlet is just as easy as replacing a switch. In fact, it follow basically the same procedure and you don’t need to worry nearly so much about getting the right type of outlet. Outlets come in three types:

  • Ungrounded. An ungrounded outlet only has two holes. It doesn’t have the round third hole used for grounding. You typically only see these in older houses.
  • Grounded. This is the standard three-prong outlet you’re probably most familiar with.
  • Ground-Fault Circuit Interrupter (GFC or GFCI). This type of switch has a built-in breaker that automatically and instantly disconnects the switch, interrupting power in case of a short. You typically find them in areas that might be exposed to water or excessive moisture, like bathrooms, garages, and workshops.

When it comes to replacing the outlet, the procedure is pretty simple. Make sure the power is off. Remove the faceplate and remove the screws holding the outlet in its box. Pull the outlet and wires out from the wall enough that you have space to work. Note where the white (neutral), black (power), and green or bare copper (ground) wires are attached on the existing outlet. Remove them and attach them to the same place on the new outlet. Turn the breaker on to test the outlet and, if it works, turn the breaker off and secure the outlet back into the wall. It’s as simple as that.


How to Add a Second Light Switch Without Wiring

Once you get the new switch and your tools, you can get started. Go to your breaker box and turn off the power to the lights that you want to control. After yo udo this test to make sure there is no power to the lights or switch by trying to turn it on.

  1. Unscrew the wall plate.
  2. Unscrew the existing switch.
  3. Mark the wires before you remove them.
  4. Disconnect the wires from the current switch.
  5. Connect wires to the corresponding parts of the Lutron switch.

Once you have these steps done, you should secure the switch, but don’t reinstall in the wall yet. Turn the power back on and make sure the switch works. If it does, turn the power back off and screw the switch in place and put the wall plate on. If it doesn’t, you can troubleshoot.


Does it matter which black wire goes where when changing a light switch?

The black wire is the hot wire, the one you should never touch with the power on. Correction: never touch any wire with the power on, and use a meter to double check they are all off before touching anything.

Next, never do any wiring unless you completely understand the task at hand.

If you have two black wires in the box one may be bringing power in, and the other leading it out. If that is all that is there then the switch can go between them in either order. If you have anything else stop and get further help where you can post pictures and a better description of this spot. Properly you should have a black always hot wire bringing power in and a red wire going to the light. Red means the line may be switched.

Sometimes electricians go cheap and use black instead of red.